
Recently, on Tindie’s first seller’s hangout, I purchased a kit I’d had my eye on: The SixtyFourPixels LoFi Gamer Kit by Tindie seller Hotchk155. It bills itself as “based around an 8x8 LED matrix which can display in glorious red/green and orange! Sound is provided by a piezo beeper for a truly retro, minimalist gaming experience”, and it looked like it would be fun to build and play with.
The kit arrived very promptly in the mail, neatly packed in a small shipping box. Inside was a lovely little black giftbox with a nicely printed sticker on top:

Peeling off the stickers holding it shut (which sadly requries damaging the box a little) revealed a well organized and tidily packed kit.
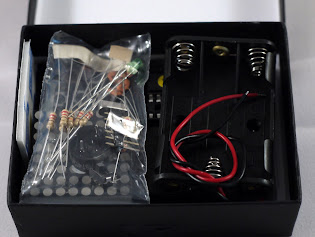
Unpacking reveals all the parts included:

All the DIPs and the display are carefully inserted in a piece of high density foam for safe shipping; the other parts come in a ringgrip bag. Also included is a small and well laid out sheet with a parts list (more of which later) the URL to a full guide, and an annotated color photo of the box contents, printed on nice thick paper and neatly folded.
The PCB appears to be well made and carefully laid out. Here it is in more detail:
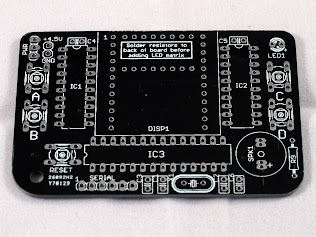
Note that despite the instructions, Hotchk155 clearly recognizes that makers will often decide to skip straight to the “making it” bit, hence the very clear and well-conceived warning “Solder resistors to back of board before adding LED matrix”. I have no doubt this will save a few hasty makers a lot of trouble.
Assembly is quite straightforward for anyone with kit building experience. For most footprints there is only one sensible choice of part. There are two exceptions to this rule: two values of resistor, but there is eight of one value and one of the other, so it’s clear which is which. More apt to confuse are the two distinct values of ceramic capacitor in the same packaging. Here, the instruction sheet helpfully specifies “(C1, C2) 33pF ceramic capacitor (33 code)” and “(C3, C4, C5, C6) 100nF cap (104 code)”, removing any ambiguity as to which goes where.
The BoM consistently contains these helpful tidbits, and they make building the kit considerably more straightforward. For instance, regarding the LED matrix display, it says “Pin 1 is indicated with a colored label”; regarding LED1 it states “The longer leg is the anode (+ terminal)”. It’s clear that Hotchk155 has taken the time to think carefully about who will make this kit and what mistakes they may make, as well as going through the process himself. The only thing I would add for those of us who tend to disdain instructions is to fit the LED matrix before the IC sockets; I did it the other way around and spent a frustrating couple of minutes trying to line the pins up.
For those of you who prefer the step by step approach the instructions are clear and detailed - and sure enough, they tell you to put the LED matrix on before the IC sockets.
When it comes to soldering the kit, the experience is generally pleasant and pain free. There are a few parts with rather small annular rings, making soldering a bit trickier for the inexperienced; other than that it’s a very simple kit to assemble. Someone with intermediate experience could certainly do it; I expect a beginner would do fine if they were being tutored. Assembly took me about half an hour.
Here’s the kit, fully assembled:

The only criticism I can level at this point is that it doesn’t come with batteries (I didn’t expect them, but it would be nice); I was forced to put the kit aside until after work, when I came home with batteries. Probably a good thing, or I would have arrived at work even later than I did.
After turning on, SixtyFourPixels shows a symbol representing a game; the first one in the list is fairly clearly space invaders. Pressing B and D scrolls between menu items; pressing C chooses one. This pattern is repeated inside games, too - the lower two buttons are generally for movement, and the upper two are for actions.
Pressing C on Space Invaders dumps you into an extremely minimalist but nevertheless recognizable space invaders clone. Ships - yours and theirs - are single pixels, as are your defenses and both of your bullets. The device’s versatile 3 color support helps distinguish things from one another. When you lose - as you inevitably will, your score, followed by the high score, scroll past the screen in oversize numerals.
The other games that come with the kit are a breakout clone, connect-4, and simon. They’re all instantly recognizable, surprisingly fun to play, and in some cases quite challenging. Space Invaders was tough, and in my brief attempt at playing Connect 4, the computer trounced me three times in a row, with embarrasing ease.
All of the controls were figured out with trial and error, incidentally - and not a great deal of error. They’re as intuitive as they can be given the limitations of the device.
The SixtyFourPixels is based on an ATMega328, the same device used by the Arduino Uno and most clones. It runs the bootloader, and the board comes with a header for connecting an FTDI serial attachment, meaning you can reprogram it yourself. The Wiki even has instructions on writing your own games.
This is an exceptionally well thought out, tidily presented, and excellently executed kit. It’s easy and fun to assemble, and has a novel concept that it takes good advantage of. Documentation is first-class. The built in games are a blast, and do a good job of showing just how fun a minimalist experience can be. I greatly look forward to future games, both first- and third- party.
I think this would be an excellent kit for teaching kids soldering and programming; it’s also good fun for anyone who likes to build kits, play with microcontrollers, or if you just want something novel. I daresay it would make a decent development board for a few non-game purposes too, potentially.
Highly recommended. Go and buy one!